Creating a Workflow
Creating a Workflow
It’s easy to create a new, custom workflow in FileEazy!
Click on the All Workflows menu and the All Workflows screen appears on the workspace. This lists all of the workflows in FileEazy!
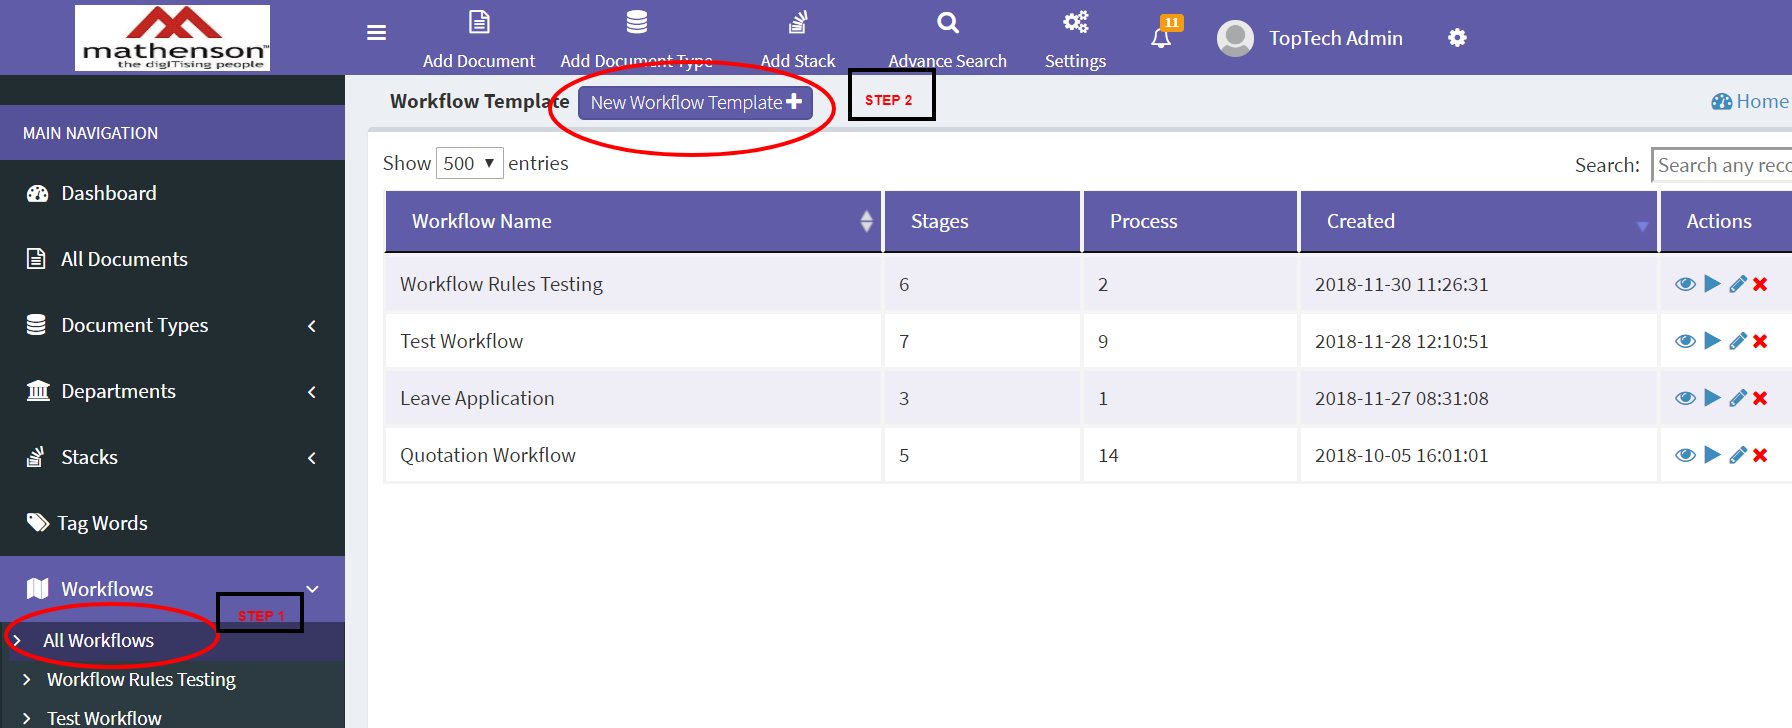
1.Click the New Workflow Template button on the top of page.
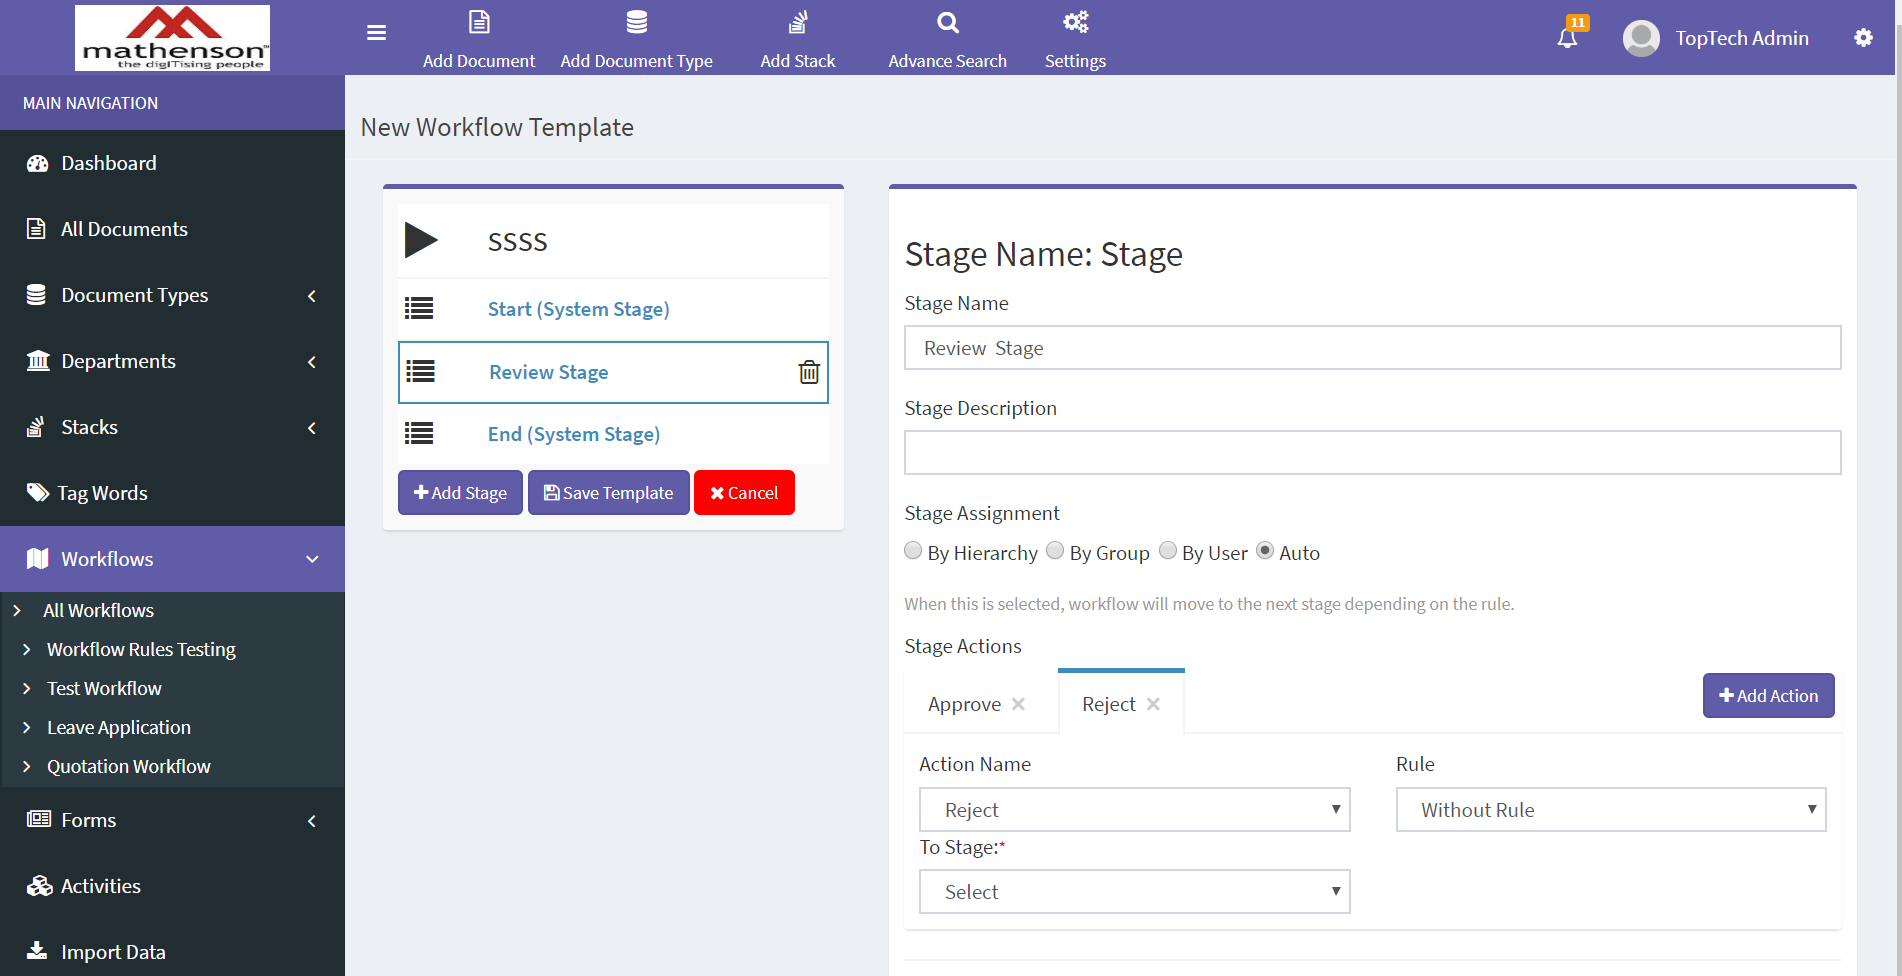
An empty workflow screen appears in the New Workflow Template page.
This page has two sections.
- Left side section contain workflow name and Stages. A Workflow will have two system defined stages called START and END. When click on left side label expand the details in right side
- Right side section contain details of right side stages and template settings.
When Click on Workflow Start Menu, see the following details
- Workflow name: (Name of the workflow)
- Workflow object type:(Two types Form or Documents, Use forms)
- Form name: (Select form type for using in workflow, this form components are used for rule based workflow)
- Color: (Color used for workflow progress, to Identify each workflow separately)

When Click on Start (System Stage), See the following details
When Click on Start (System Stage), See the following details
- Stage Name: (Give a name to identify each stage, Start and End stage name can’t change)
- Stage Description: (Description of stage, Start and End stage can’t change)
- Stage Assignment, There are 4 type of stage assignment
- Auto :- (When this is selected, workflow will move to the next stage depending on the rule. Actions taken automatically in this stage).
- By Hierarchy:-(Actions can only taken by reported user. When this is selected, the manager of the user who submitted a form will get a notification automatically.).
- By Group:(Actions can only taken by users in a department. Add some criteria, like all user, anyone, percentage)
- By User : (Actions can only be taken by a specified users)
- Escalation Rule: (You can set escalation rules here. The document will move to the selected stage if no action was taken within the specified days. No escalation will be done if number of days set to 0 or no stage is selected).
- Stage Actions: (Here we can manage all actions. Like Approval and Reject).
- Rule: Two types of stage actions, Rule based and Without rule actions).
- Without rule: (Here directly select to stage).
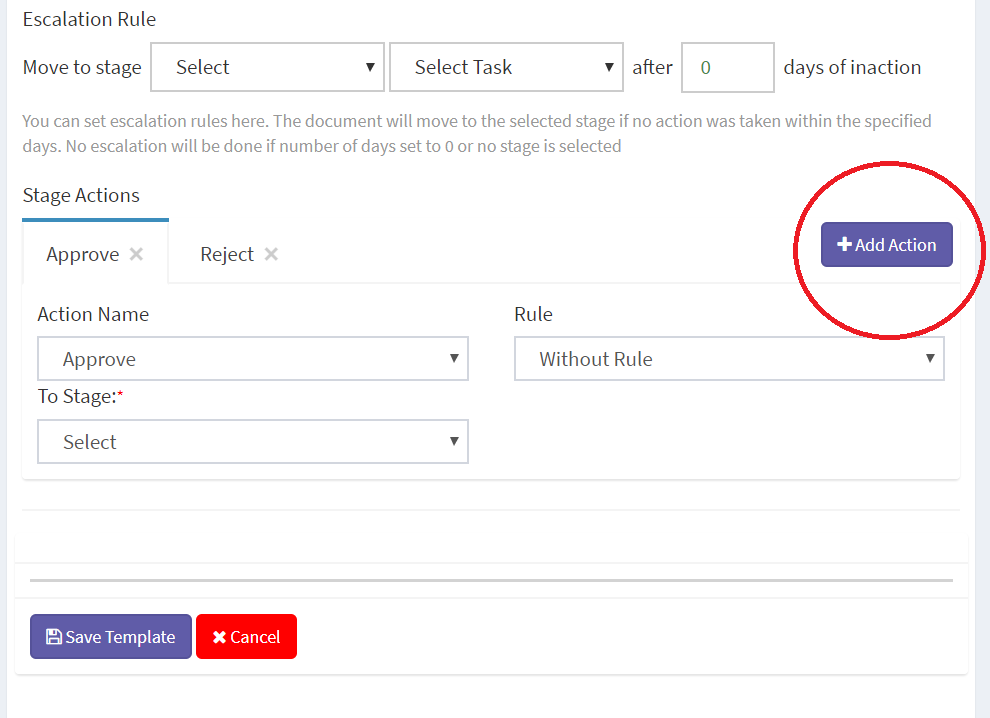
- With Rule:(Here we can add rules)
If we select with rule screen displayed like below image
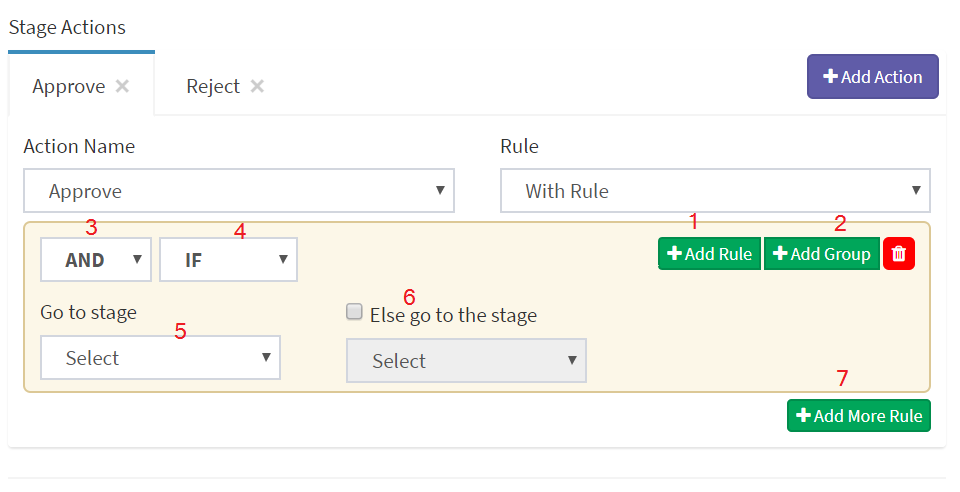
- Add Rule :- (Button used to add rules, set rule components, operator and values)
- Add Group: (Arrange rules in different groups)
- Condition:(Set different conditions like AND or OR)
- Case:(Set rule if or else_if)
- Go to Stage:(If given condition is true it will redirect to if stage)
- Else Stage:(If given condition is false, it will redirect to if stage or else if stage)
- Add More Rules:(Add another set of rules, like else if)
When click Add rule display like this.
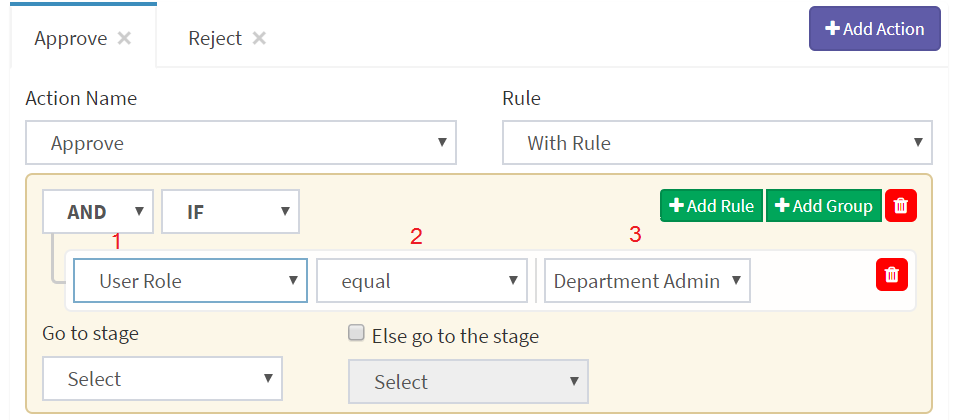
Details of above image
1.Rule Components(It contains Form Components, Document Components and Other common components like, User role, user, department etc.)
2.Comparison operator (Equal or Not equal Like)
3. Comparison value
SAMPLE RULES FOR QUOTATION WORKFLOW APPROVAL
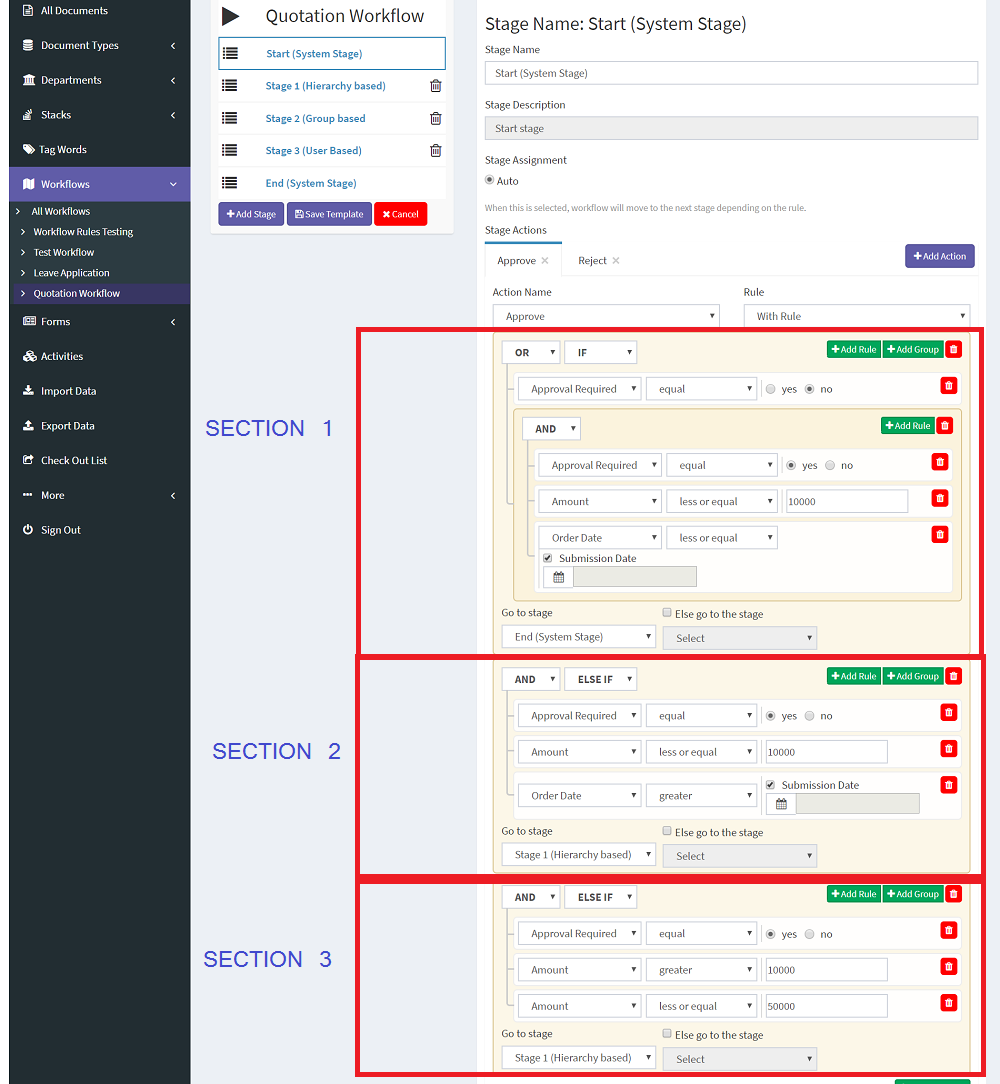
Explanation Of Above Rule for Approval
Section 1 (IF)
IF (approval required == No) OR (GROUP Rule 1) then its Approved, Goto END Stage
Explanation of Group Rule 1
if((Approval required == yes) AND (Amount <= 10000) AND ORDER DATE <= Submission Date) then its approved, Goto END Stage
Else Goto Section 2
Section 2 (ELSE IF)
if((Approval required == yes) AND (Amount <= 10000) AND ORDER DATE > Submission Date) then its approved, Goto Stage 1 (Hierarchy based)
Else Goto Section 3
Section 3 (ELSE IF)
if((Approval required == yes) AND (Amount > 10000) AND (Amount <= 50000) ) then its approved, Goto Stage 1 (Hierarchy based)
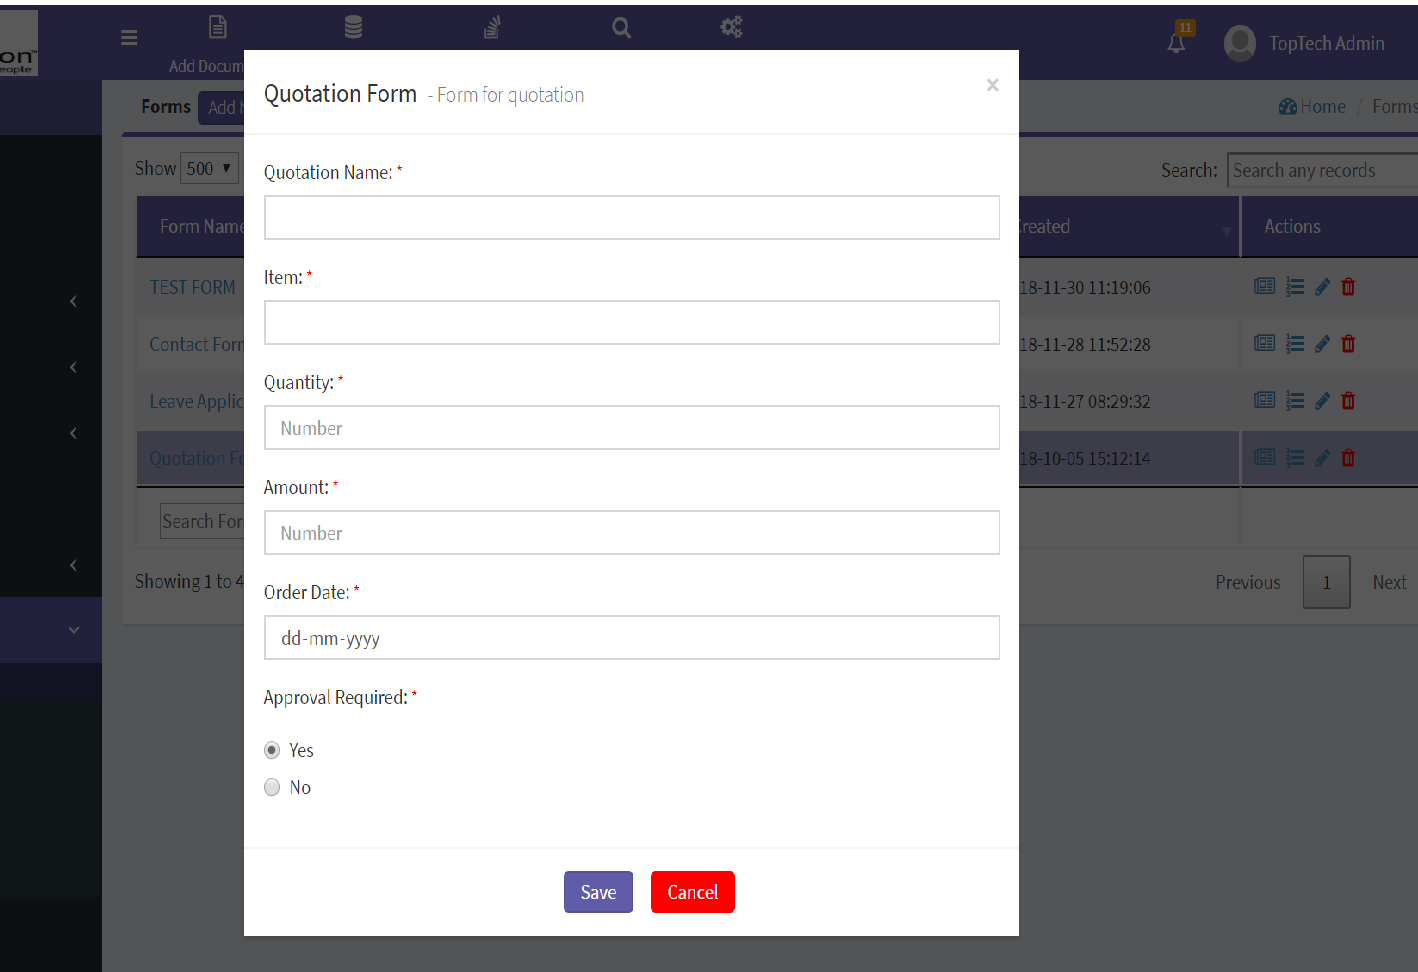
QUOTATION FORM
Quotation form contains:
- Quotation Name: (Name of the quotation).
- Item: (Item to purchase)
- Quantity:(Quantity of item).
- Amount:(Quotation amount).
- Order Date:(Order Date)
- Approval required
When a user submit a quotation form .Workflow is in Sart Stage. In this stage evaluate all user inputs with actions.
1.START STAGE
All actions in start stage will be automatically
Case 1
Quotation Name : Test 1
Item: Mobile
Quantity:1
Amount:10000
Order Date:06-12-2018
Approval Required: No
After submission in start stage below rule satisfied
IF (approval required == No)
It will be approved and Goto END Stage with approve status
Notification: The submitter of the form will be get notification.
Case 2
Quotation Name : Test 2
Item: Mobile
Quantity:1
Amount:10000
Order Date:06-12-2018(Today Date)
Approval Required:Yes
After submission in start stage below rule satisfied
if((Approval required == yes) AND (Amount <= 10000) AND ORDER DATE <= Submission Date)
It will be approved and Goto END Stage with Approve status
Notification: The submitter of the form will be get notification
Case 3
Quotation Name : Test 2
Item: Mobile
Quantity:1
Amount:10000
Order Date:07-12-2018(Upcoming Date)
Approval Required: Yes
After submission in start stage below rule satisfied
if((Approval required == yes) AND (Amount <= 10000) AND ORDER DATE > Submission Date)
It will approved and Goto Stage 1 (Hierarchy based) Stage
Notification: The assignees of Stage 1 and submitter of the form.
Case 4
Quotation Name : Test 2
Item: Mobile
Quantity:1
Amount:20000
Order Date:06-12-2018(any Date)
Approval Required: Yes
After submission in start stage below rule satisfied
if((Approval required == yes) AND (Amount > 10000) AND (Amount <= 50000) )
It will approved and Goto Stage 1 (Hierarchy based) Stage
Notification: The assignees of Stage 1 and submitter of the form.
Case 5
Quotation Name : Test 2
Item: Mobile
Quantity:1
Amount: 60,000
Order Date:06-12-2018
Approval Required: Yes
After submission in start stage below rule satisfied
if(Amount > 50,000)
It will rejected and Goto END Stage
Notification: The submitter of the form will be get notification.
2.Stage 1 (Hierarchy based)
In this stage action can be taken by the submitter’s manager (Who the manager is decided by “Reports To” from the User master).
In this stage, 3 actions are defined
- Approve :- When click approve button workflow will move to next stage (Stage 2 (Group based).
Notification: The assignees of Stage 2 and submitter of the form.
- Reject :- When Reject is clicked workflow will move to END Stage
Notification: The assignees of Stage 2 and submitter of the form.
- On-Hold :- When on-hold clicked workflow will remain in the same stage
Notification: The submitter of the form will be get notification.
3.Stage 2 (Group based)
In this stage action taken will taken by Group user
In this stage 3 actions are defined
- Approve :- When click approve button workflow will move to next stage (Stage 3 (Group based).
Notification: The assignees of Stage 3 and submitter of the form.
- Reject :- When Reject is clicked workflow will move to END Stage
Notification: The submitter of the form will be get notification.
- On-Hold :- When on-hold clicked workflow will remain in the same stage
Notification: The submitter of the form will be get notification.
4.Stage 3 (User based)
In this stage action taken will taken by a user
In this stage 3 actions are defined
- Approve :- When click approve button workflow will move to END.
Notification: The submitter of the form will be get notification.
- Reject :- When Reject is clicked workflow will move to END Stage
Notification: The submitter of the form will be get notification.
- On-Hold :- When on-hold clicked workflow will remain in the same stage
Notification: The submitter of the form will be get notification.